Table of Contents
- Introduction
- Understanding Inverter Basics
- Gathering Necessary Tools and Materials
- Step-by-Step Inverter Wiring Process
- Safety Precautions
- Maintenance Tips
- Troubleshooting Common Issues
- Conclusion
Introduction
Are you tired of power outages leaving you in the dark? Learning how to do easy way inverter wiring for your home can be a game-changer. This guide will walk you through the process, ensuring you have a reliable power backup system when you need it most. Whether you’re a DIY enthusiast or just looking to understand the basics, we’ve got you covered with this comprehensive tutorial on inverter wiring for home.
Understanding Inverter Basics
Before diving into the wiring process, it’s essential to grasp the fundamentals of how an inverter works:
- An inverter converts DC (Direct Current) power from batteries to AC (Alternating Current) power used in homes.
- It provides backup power during outages by drawing energy from connected batteries.
- Inverters come in various capacities, measured in VA (Volt-Ampere) or Watts.
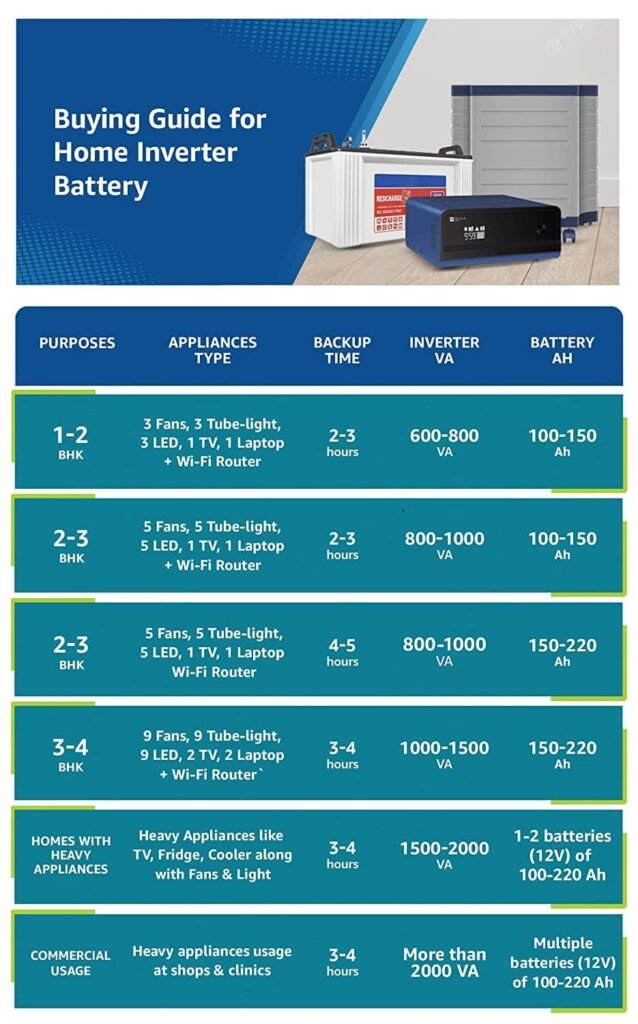
To choose the right inverter for your home, consider:
- Your power requirements
- The number and type of appliances you want to run during an outage
- The duration of backup power needed
1. Inverter Capacity and Power Requirements
Appliance | Power Rating (Watts) | Quantity | Total Power (Watts) |
|---|---|---|---|
LED Light Bulb | 10 | 5 | 50 |
Ceiling Fan | 70 | 2 | 140 |
Laptop Charger | 60 | 1 | 60 |
Refrigerator | 200 | 1 | 200 |
Television | 120 | 1 | 120 |
Total Power Requirement | 570 |
Gathering Necessary Tools and Materials
Tools and Materials Checklist
Tool/Material | Quantity | Purpose |
|---|---|---|
Inverter unit | 1 | Converts DC to AC power |
Battery | 1 or more | Stores electrical energy |
Battery cables (red/black) | 2 each | Connects battery to inverter |
Wire stripper | 1 | Strips insulation from wires |
Screwdriver set | 1 set | Tightens screws |
Electrical tape | 1 roll | Insulates electrical connections |
Multimeter | 1 | Measures electrical values |
Circuit breaker | 1 | Protects against electrical overload |
Mounting brackets | 2 | Secures inverter to wall |
Protective gear | 1 set | Ensures safety (gloves and safety glasses) |
This checklist ensures that readers have all necessary tools and materials before starting the wiring
To successfully complete your inverter wiring, you’ll need the following items:
Make sure to purchase high-quality materials from reputable sources to ensure safety and longevity of your setup.
Step-by-Step Inverter Wiring Process
Follow these steps for easy way inverter wiring for your home:
- Choose the right location: Select a dry, well-ventilated area for your inverter and battery setup. Avoid direct sunlight and ensure easy access for maintenance.
- Mount the inverter: Use the mounting brackets to securely attach the inverter to the wall. Ensure it’s level and stable.
- Install the battery: Place the battery on a sturdy surface near the inverter. If using multiple batteries, connect them in series or parallel as per the inverter’s specifications.
- Connect the battery to the inverter:
- Attach the red (positive) cable to the positive terminal of the battery and the inverter.
- Connect the black (negative) cable to the negative terminals.
- Ensure all connections are tight and secure.

- Install the circuit breaker: Place a circuit breaker between the battery and inverter for added safety.
- Connect the inverter to your home’s electrical system:
- Identify the main electrical panel in your home.
- Install a transfer switch to safely connect the inverter to your home’s circuits.
- Connect the inverter’s output to the transfer switch.
- Ground the system: Properly ground the inverter and battery setup to prevent electrical hazards.
- Test the system: Turn on the inverter and test it with a few appliances to ensure everything is working correctly.
Safety Precautions
When working with electrical systems, safety should always be your top priority. Keep these precautions in mind:
- Always turn off the main power supply before starting any electrical work.
- Wear protective gear, including gloves and safety glasses.
- Never touch bare wires or terminals with your hands.
- Keep water and other liquids away from the inverter and battery setup.
- Follow manufacturer instructions carefully.
- If you’re unsure about any step, consult a professional electrician.
Maintenance Tips
To keep your inverter system running smoothly, follow these maintenance tips:
- Regularly inspect battery terminals for corrosion and clean them if necessary.
- Check and tighten all connections periodically.
- Keep the inverter and battery area clean and free from dust.
- Monitor battery water levels (for lead-acid batteries) and top up when needed.
- Perform a full system test at least once every three months.
Troubleshooting Common Issues
Even with proper installation and maintenance, you might encounter some issues. Here are some common problems and their solutions:
- Inverter not turning on:
- Check all connections
- Ensure the battery is charged
- Verify the circuit breaker hasn’t tripped
- Reduced backup time:
- Check battery health and replace if necessary
- Reduce the load on the inverter
- Unusual noises:
- Inspect for loose connections
- Check if the cooling fan is working properly
- Overheating:
- Ensure proper ventilation
- Reduce the load if it exceeds the inverter’s capacity
For more complex issues, consult the manufacturer’s manual or seek professional help.
Conclusion
Learning how to do easy way inverter wiring for your home can provide peace of mind during power outages and save you money on professional installation. By following this guide, you can set up a reliable backup power system for your home. Remember to prioritize safety, follow manufacturer instructions, and perform regular maintenance to keep your system running efficiently.
Have you successfully wired an inverter in your home? Share your experience in the comments below! If you found this guide helpful, don’t forget to share it with friends and family who might benefit from having a backup power solution.


Ok